

Recreating Worlds…

One of the goals of the WC4 remaster is to blend some of the best elements of both the WC4 releases (PC & PlayStation) to create the ultimate Wing Commander experience. For example the Playstation version contained color communications, whereas the PC version was monochrome (though it could be changed to the hue of your HUD selection).
Additionally, there are unique bits of CG across the many platforms that in many instances, the source is just too degraded to properly upscale – the PC version used full DVD resolution (29.97 Frames per second and 640 x 360 resolution) so that gives us a reasonable jumping off point for the majority of the FMV – however PlayStation was compressed to save space at release time and end up at around 15 frames per second and around 256 X 224 resolution (upscaled to 640 X 240).
The result is footage that is just not useable for our purposes – and unfortunately there are some unique sequences included in these releases that, while they might not add much to the story itself, are some neat added sequences; like a flythrough of a hidden Bearcat factory. So we decided to try and recreate the “lost” FMV using the in-game assets and modern machines.
Compositing 1996 All Over Again
If we wanted to fully recreate the actual FMV we would need Origin’s original shooting models and a period correct Silicon Graphics rig – neither of which are readily available. For the models we will use the in-game assets, which I’ve tried to make as close as possible to the original assets, down to the rivets.
As for rendering we have tons more options in 2020 than were available in 1996: 3DsMax, Lightwave, Blender, etc. I use Blender by choice so that’s what we’re doing here. However – the most recent Blender branches (2.8X – 2.9A) default to Cycles or EVEE rendering options, which use more realistic light bouncing than was considered top of the line in 1996. I actually had to revert to a previous version of Blender (2.79) in order to make full use of Blender’s internal render engine to try and recapture that same SGI look and feel.
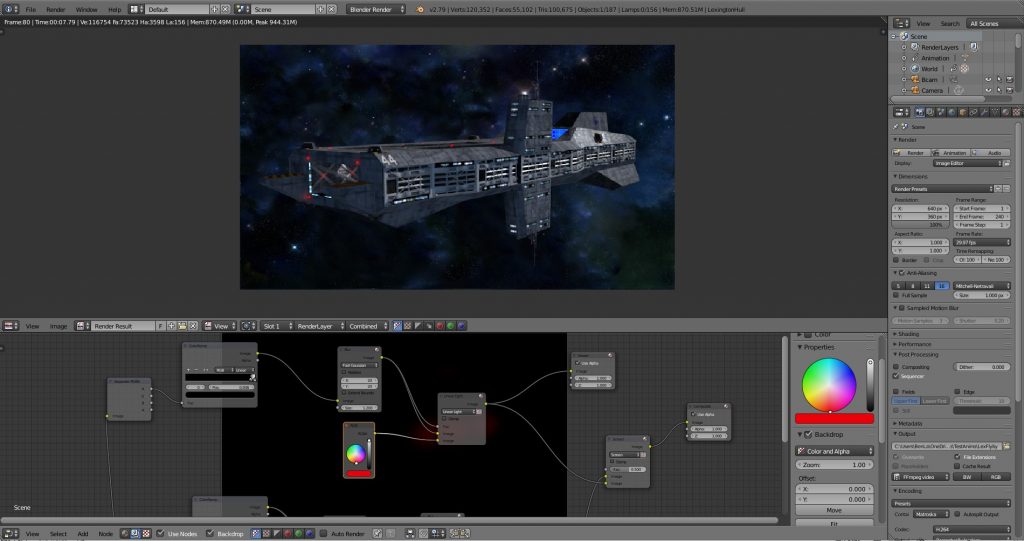
I reset all the render options to match the DVD source data. I had to spend a bit of time in the compositor, making sure we got the first pass of light blooms correct, but the FMV always added a second layer of bloom for objects that emit red light, so we need to build a second pass to enhance the glows. This begs the question, “Why not render the movie at 4K and then add the grain and artifacts in post?” Simply put, we tried it, and it looked too modern and didn’t mesh well with the other upscaled material.
Finally, I added a touch of sampled motion blur for a bit of realism. This is a bit controversial as some of the FMV didn’t have it and some did. It seems like there wasn’t as consistent a style guide as we see in later titles. You also have to use fewer samples to capture the same fuzziness we see in the source video, more samples creates a smoother image, so I ended up using a paltry 3 samples with a very narrow aperture after some trial and error.
Lights, Camera…
Of course lighting always plays a part, Most of the original FMV relies on a single light source and some 3 point light rigs in a few, select instances. I emulated that effect by setting the single light source to cast small sample and inaccurate shadows (PCs have gotten way better at ray tracing since 1996), and add a tiny bit of ambient occlusion, You can get pretty close to the original footage.
Naturally this is the halfway point of the process – after we render the DVD quality footage, I hand it off to ODVS and his AI Upscaling process. The end result is stylistically accurate and would fit in very well with the original source material. The video below is a technical demo of this process complete with a comparison against the original PC FMV.